Phantasy Star IV Game Engine Internals Part 1: States of Play
In the first of a series dedicated to the making of classic retro RPGs, we break down the reverse-engineered assembly code that brought the iconic world of Sega's legendary Phantasy Star IV to life.
For 1993, Phantasy Star IV was a large cart: 24 megabits (or 3 megabytes).
This is large enough that the developers required approval from Sega, and they were quite worried it would not get approved! A substantial part of this 24 “megs” is simply the amount of code. Handcrafted, line by line, PSIV clocks in at over 350,000 lines of assembly.
Developing a game today is no small feat, but back then programmers had no off-the-shelf, highly capable game engines like Unity, Unreal, or RPG Maker to start from. They had to write everything from scratch–including their own game engines–at the level of individual processor instructions. It’s incredible what these early software pioneers were able to do with so little, and so painstakingly. And yet, despite their feats, tragically little is written about the practice from the time.
This article series is dedicated to fixing that. We will examine the state of the art of the era by breaking down how Phantasy Star IV was programmed from the silicon up. If you’re a fan of the game, fascinated by the history, or interested in learning how to modify PSIV yourself, you’ll enjoy a behind-the-scenes look at its inner workings, only made visible by reverse engineering that mass of code hidden in the cartridge’s read-only memory.
From the first glimpse of the classic “SEGA” logo all the way to the game’s end, there are only a “finite” number of possible “states,” used to model the different modes the game could be running in at any given point in time. We’ll refer to these states as “game modes.”
Let’s look at the code:
MainGameLoop:	move.w	(Game_Mode_Index).w, d0	movea.l	GameModePtrs(pc,d0.w), a0	jsr	(a0)	bra.s	MainGameLoop
GameModePtrs:	dc.l	GameMode_Sega				; 0	dc.l	GameMode_Title				; 4	dc.l	GameMode_LoadFieldMap		; 8	dc.l	GameMode_Field				; $C	dc.l	GameMode_LoadBattle			; $10	dc.l	GameMode_Battle				; $14	dc.l	GameMode_JmpToVInt_Prepare	; $18
Unless you’re already familiar with programming the Motorola 68000 processor (the CPU used by the Sega Genesis), this probably looks like nonsense. Let’s clear it up.
First, it reads from a global Game_Mode_Index variable, stored in RAM, and uses that to select a game mode routine to run.
move.w (Game_Mode_Index).w, d0
movea.l GameModePtrs(pc,d0.w), a0
Then, it runs that routine (jsr stands for “jump to subroutine”). That is, a “state” in an FSM is essentially just a routine to run. This routine defines the logic for that game mode via CPU instructions.
jsr (a0)
When it returns, we loop back.
bra.s MainGameLoop
The process then repeats, endlessly. This is what makes it a main game “loop.” Each game mode’s subroutine is designed to be called repeatedly by the main game loop, often (but not always) once per frame.
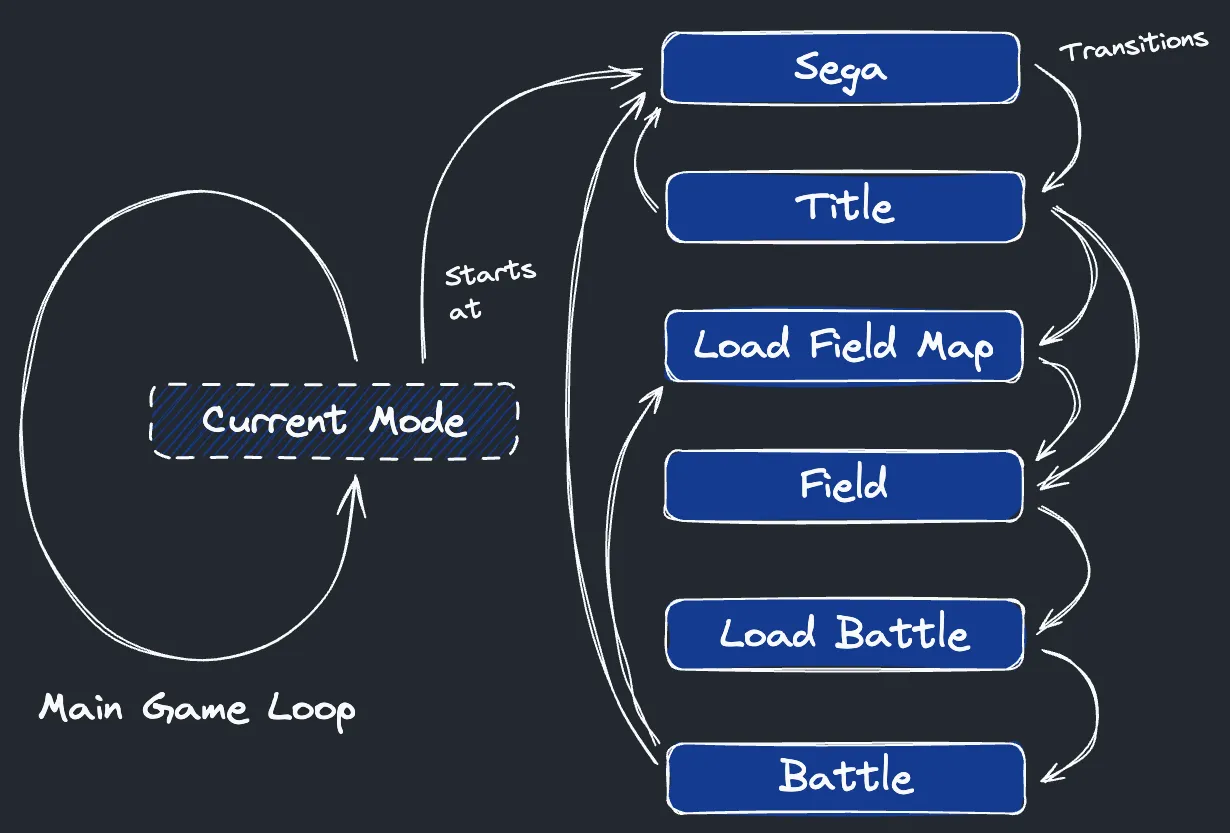
There are 6 such routines, or states, for the different game modes2.
Figure 1. The main game loop, its states, and transitions.
This mode runs the rest of the title sequence, including the new game and save selection. As we’ll see, this routine itself includes another FSM, representing different stages of the title sequence.
As you might expect, this mode runs battles. It’s probably the most complex subsystem of the game. It contains multiple FSMs, with dozens of different states. Roughly 30% of all of the game logic (i.e. all assembly that isn’t just raw data like sprite graphics or text) is spent on the Battle game mode.
Each state is responsible for switching to a new state when appropriate. For example, the game begins in the Sega mode (by virtue of RAM being zero’d out), and this state, before exiting, sets the game mode to Title.
Ultimately, there is a simpler way to think about it. There are essentially just two main game modes: Field mode, and Battle mode. Each of those is then paired with an instantaneous “load” mode, devoted to one-time initialization. The remaining modes (Sega and Title) are just for the title sequence and game selection.
Figure 2. The main game loop simplified. What we know of as "the game" comes down to two main modes: Field and Battle.
Mode: Sega
The Genesis, like other consoles of the era, essentially ships as only half of a usable system. It can do nothing without a cartridge to “complete” the main board. As such, there is no built-in branding like modern consoles, which ship with entire operating systems. The SEGA logo had to be programmed bespoke into every cartridge. This is also what allows each game to present the logo in its own way. For PSIV, this is a snippet of what that looks like:
This is a simple state that starts the music, displays the Sega logo and animates its colors until the player presses Start or until 3 seconds pass.
The last two lines end it by moving the game mode to the Title state and returning back to the main game loop.
addq.w #4, (Game_Mode_Index).w
rts
Mode: Title
States in a state machine can themselves have “sub-states” by embedding another finite state machine (FSM). This is partly what makes this simple pattern so useful. It composes with itself, allowing more complicated nested structures to be constructed with ease.
This is exactly what is done in the Title state, which cycles through the epic title sequence of PSIV.
GameMode_Title:	move.w	(Game_Mode_Routine).w, d0	movea.l	TitleRoutinePtrs(pc,d0.w), a0	jmp	(a0)
TitleRoutinePtrs:	dc.l	TitleRoutine_FadingText			; 0	dc.l	TitleRoutine_PressStartButton	; 4	dc.l	TitleRoutine_CharPortraits		; 8	dc.l	TitleRoutine_ScrollingText		; $C	dc.l	TitleRoutine_PickOption			; $10
Just like there is the global Game_Mode_Index variable to track the outter most FSM state in the main game loop, a global Game_Mode_Routine variable is used to store the index of the “sub-state” in whatever inner FSM. In the Title state, this is used to organize the title loop into 5 sub-states, seen above.
Within these states is quite a bit. Aside from the fairly involved visual sequences, there is also the code for loading saved games from SRAM and initializing new games.
When a past save is chosen, this state hands off to the next, Load Field Map.
New games, however, go directly to the opening cutscene via the Field state.
Mode: Load Field Map
Now we’re into actual “game” states.
A lot happens in order to a load a map into the playable field. To understand this, we should first clarify: what is a map to PSIV, anyway?
A map configures:
What tiles a player sees, how they collide, and if they are interactable with the “speak” button
The objects that are present and their sprites, locations, and behavior
The music which should play
Transitions to other maps
Chest locations and contents
Events which can trigger based on arbitrary conditions (like when the player moves to a certain location)
To load a map is to prepare the hardware to make all of this happen in the Field state.
Mode: Field
Field is one of the two “main” game modes (Field and Battle). The Field state is used anywhere you aren’t in a battle. All maps and cutscenes are realized within this state.
GameMode_Field:	jsr	(UpdateRNGSeed).l	move.w	(Game_Mode_Routine).w, d0	movea.l	FieldRoutinePtrs(pc,d0.w), a0	jmp	(a0)
FieldRoutinePtrs:	dc.l	FieldRoutine_Controls		; 0 - In control of the characters	dc.l	FieldRoutine_Menu			; 4 - Player menu	dc.l	FieldRoutine_Interaction	; 8 - Interaction that occurs when you press the Speak button	dc.l	FieldRoutine_Event			; $C - Events	dc.l	FieldRoutine_Settings		; $10 - Window that pops up when you press Start	dc.l	FieldRoutine_Battle			; $14 - initial settings for random battles	dc.l	FieldRoutine_Shop			; $18 - When you talk to shopkeepers	dc.l	FieldRoutine_PlaceName		; $1C - Window displaying the name of a location upon entering	dc.l	FieldRoutine_WorldMap		; $20 - Map of Motavia and Dezolis....unused	dc.l	FieldRoutine_ItemFound		; $24 - Mainly when you get items through treasure chests; also applies to the Repair Kits you can get in the Weapon Plant on Dezolis
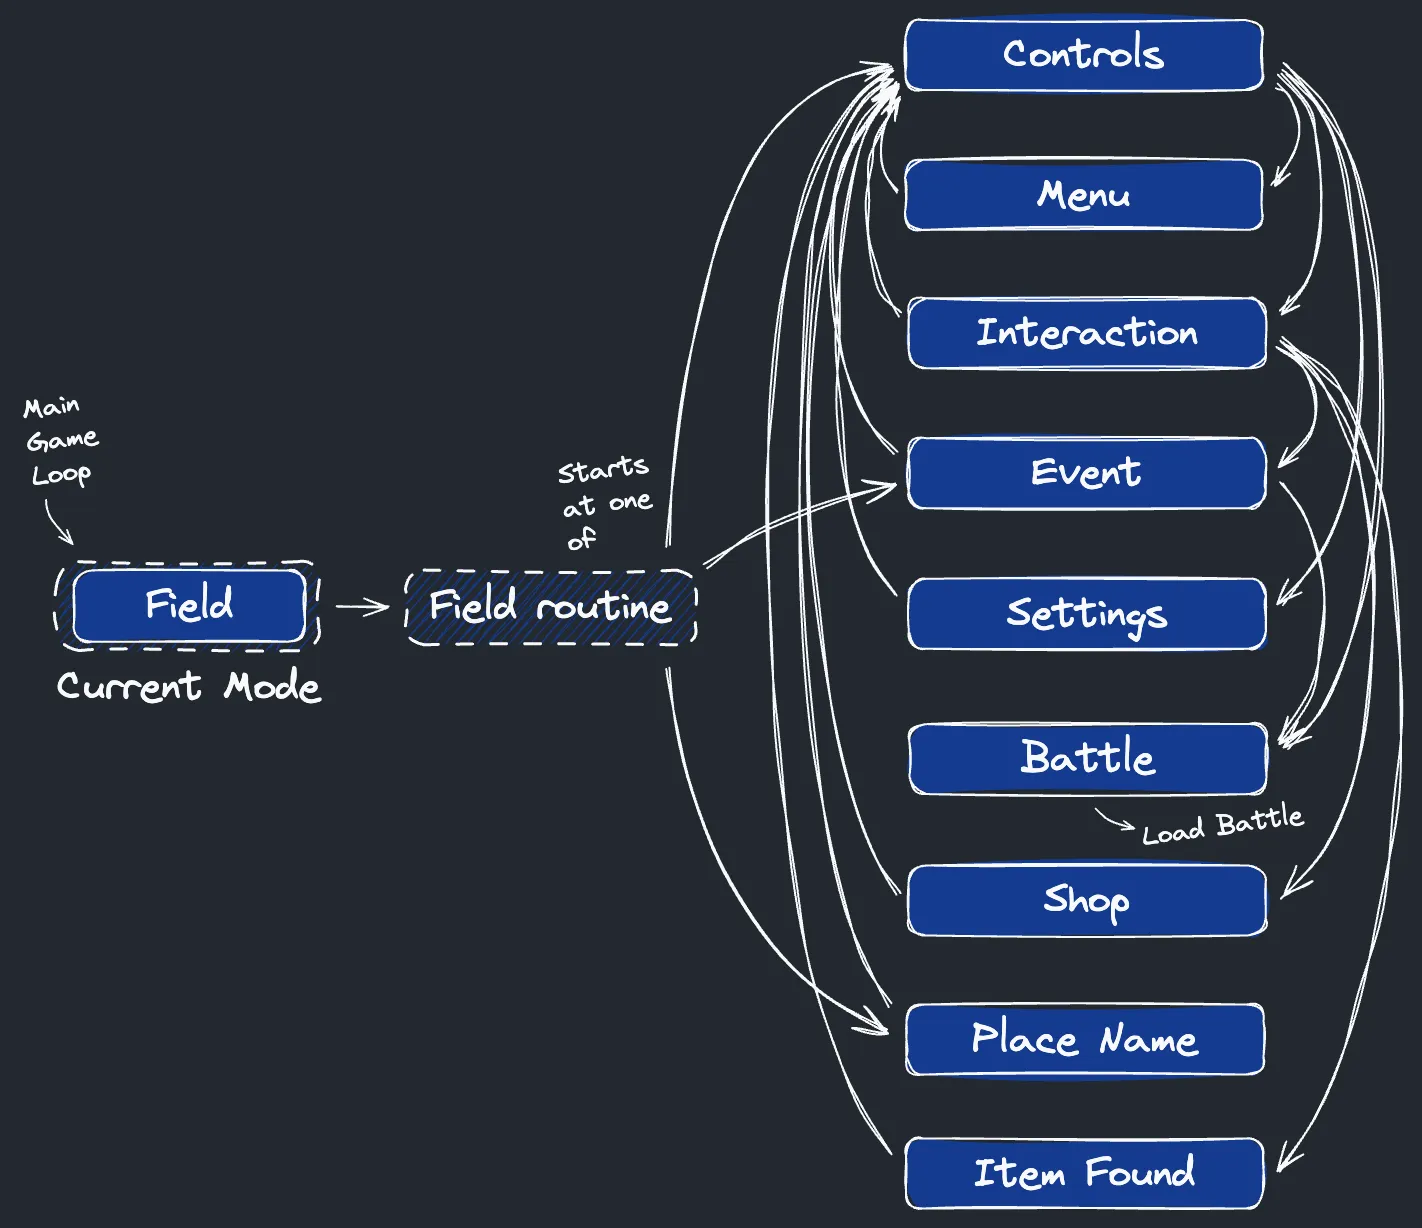
Shown above under FieldRoutinePtrs, there are 10 sub-states, representing different “field routines.”
Figure 3. Field routines and their transitions.
Controls
As the name implies, this processes player input. We’ll examine this state in more detail below. It’s responsible for transitioning to the Menu, Interaction, Settings, or Battle (e.g. random encounters) states based on player input.
Menu
This state displays the in-game menu for examining and updating your party. This uses a common window subsystem, which is complicated enough for its own post, so we won’t go into much detail here.
Interaction
This state runs various checks upon the player using the “Speak” button (C) and so is how the game triggers NPC dialog, chests, and other events. This is the main way that the FSM transitions to the Event (e.g. when an interaction triggers a cutscene), Shop (when interaction with a shopkeeper tile), and Item Found (e.g. when opening a chest) states. Most NPC dialog technically doesn’t require a state transition, and runs within this state utilizing the dialog subsystem. This is another complex subsystem which we’ll cover in a follow-up post about events and cutscenes in general.
Event
This state is used to remove control from the player, and give freedom to event subroutines to control the game as they see fit, such as by moving objects, fading out the field, showing panels, or running dialog. We’ll cover this state in more detail in a follow-up post.
Settings
Opens a window like the Menu state, but with a different menu. This is used for the Start button menu, which includes “settings” like message speed.
Battle
Various field routine states transition to battles, such as Controls for random encounters, or Event for boss battles. It’s not enough to simply set the top-level game mode to Battle, though. Coming from the field, there is other initialization that has to happen, and it isn’t always the same for every battle, like what music to play or (in the case of Motavia) what background to use.
Shop
Another heavy user of the window subsystem, this state is used by shops and inns.
Place Name
This state is responsible for displaying the brief window that appears when transitioning to a new, named map.
Transitioned from the Interaction state, it’s used for receiving an item from a tile or chest. It’s a surprisingly complicated state, again utilizing the window subsystem.
Field routine: Controls
A great majority of playtime is spent in this sub-state, processing player input, making this state one of the more significant, and therefore worth examining a little more closely. It is also relatively simple.
The most relevant section of this subroutine is shown commented, below:
FieldRoutine_Controls:
; snip...
jsr (UpdateCharacterStandCollision).l
jsr (UpdateCharacterCollision).l
bsr.w ChkCharStatsUpdate
+
btst #0, (Tile_Coll_Run_Event_Flag).w
bne.s+
bsr.w RunEvents
bne.w++; branch if flagged to process an event
+
jsr (RunMapTransitions).l
bne.w+; branch if flagged to change maps
bsr.w RunRandomBattles
bne.w+; branch if flagged to run random battles
jsr (FieldControls_GetInput).l
bne.w+
jsr (Field_UpdateObjects).l
jsr (AnimateTiles).l
jsr (RunMapUpdates).l
jsr (UpdateCameraXPosFG).l
jsr (UpdateCameraYPosFG).l
jsr (UpdateCameraXPosBG).l
jsr (UpdateCameraYPosBG).l
jsr (RefreshMapLayout).l
jsr (RefreshTilesAsYouMoveFG).l
jsr (RefreshTilesAsYouMoveBG).l
; snip...
All in all, this routine accommodates the necessary functions to enable player controls. Several functions rely on map data loaded by the Load Field Map state.
Collision detection based on map tile data. This is used not just to keep players from walking through walls, but also tracking the tiles below and around the player as they move. Those tiles may affect other processes like random encounters or map transitions. For example, battles won’t run if you’re standing next to a town.
jsr (UpdateCharacterStandCollision).l
jsr (UpdateCharacterCollision).l
Movement-related status ailments, such as poison damage.
bsr.w ChkCharStatsUpdate
Triggering cutscenes or other events. Map data configures zero-or-more subroutines which run during player movement and may, well, “run events” by changing the Field sub-state to FieldRoutine_Event (stored in the Game_Mode_Routine variable discussed earlier).
btst #0, (Tile_Coll_Run_Event_Flag).w
bne.s+
bsr.w RunEvents
bne.w++; branch if flagged to process an event
Transitioning maps based on the locations of transitions (e.g. staircases or doorways) and the maps they transition to. This is responsible for changing the top-level state to Load Field Map to facilitate the transition.
jsr (RunMapTransitions).l
bne.w+; branch if flagged to change maps
Running random battles. This checks for various exceptions (like town proximity mentioned above), and if none are met, runs a pseudo-random number generator4 to decide whether or not to trigger the battle. This transition again utilizes the elegant FSM pattern: it sets the sub-state to FieldRoutine_Battle which prepares the game transition to the top-level Battle state.
bsr.w RunRandomBattles
bne.w+; branch if flagged to run random battles
Processing player input. Up until this point, the previous checks are effectively reacting to previous player input from the last run through the game loop. Before checking input again, it must first see if it now needs to transition to another state (e.g. to run an event or a battle). If we’ve got here, it means we don’t. So, it’s time to check input again. First, it checks for button presses. If there is a relevant button pressed, it will transition the Field sub-state differently: FieldRoutine_Menu for the A button, FieldRoutine_Interaction for C, or FieldRoutine_Settings for Start.
jsr (FieldControls_GetInput).l
bne.w+
Moving and animating objects. Lastly, if we’re still not transitioning to another sub-state, we remain in Controls and update objects. Every object, including playable characters, has its own routine which controls its behavior, including reacting to directional input.
jsr (Field_UpdateObjects).l
Animating the map and moving the camera. Like objects, the map can also animate, usually by virtue of routines which cycle colors in the palette configured in the map data.
jsr (AnimateTiles).l
jsr (RunMapUpdates).l
jsr (UpdateCameraXPosFG).l
jsr (UpdateCameraYPosFG).l
jsr (UpdateCameraXPosBG).l
jsr (UpdateCameraYPosBG).l
jsr (RefreshMapLayout).l
jsr (RefreshTilesAsYouMoveFG).l
jsr (RefreshTilesAsYouMoveBG).l
Wait for the next vertical interrupt. This is actually quite important. This locks the checks and updates to a sensible frame rate (60 FPS for NTSC hardware, or 50 for PAL). Knowing the timing is important for any game loop. How do you know what it means to move something 1 pixel, if you don’t know if it’s 1 pixel per 1 millisecond, or 1 pixel per 16 milliseconds? Retro engines relied on these vertical interrupts for timing. This wasn’t just because it was useful for game loops; it was also because they had to. The “CRT” displays of the time required it.
This isn’t shown in the snippet above, but the routine has various ways of exiting which invoke a routine like VInt_Prepare that waits for the vertial interrupt, after first ensuring the Genesis’s “color RAM” (or CRAM) values are up to date.
Mode: Load Battle
Battles are a complex affair, and initializing them is no exception. This mode is too complex to cover in detail, but it’s interesting to take a look at what exactly is being initialized. In particular, there is a lot to say about the graphics.
Graphics. A substantial portion of code here is directed at controlling the Sega Genesis’s “video display processor” or VDP–what we’d call a graphics processing unit (or GPU) today. Back then, graphics programming worked very differently. Since the 2000s and NVidia’s early GeForce cards, GPUs are increasingly “just” incredibly powerful number-crunchers. This is why graphics cards are more and more used in domains other than computer graphics, like cryptography or artificial intelligence. Back in the days of the Sega Genesis however, we didn’t have chips fast enough to be so flexible, so the hardware had to be optimized for very specific capabilities. For example, they had a specific number of Z-ordered “planes” where you could draw “tiles” with specific dimensions. There were specific capabilities for “sprites,” with a set of predefined attributes. It had specific scrolling modes built-in. The hardware had to balance hard-won speed with flexibility and programmability, while retaining enough visual capability to still compete. In this struggle, flexibility suffered. And programming it was no small feat. Just to give you an idea, look at this small piece of the initialization code:
jsr (ClearPlanes_A_B_Buf).l
ori.b #$10, (VDP_Reg1_Val+1).w
move.w (VDP_Reg1_Val).w, (a6)
move.w #$8F01, (a6)
move.l #$93FF940F, (a6)
move.w #$9780, (a6)
move.l #$40000083, (a6)
move.w #0, (a5)
loc_696C:
btst #1, $1(a6)
bne.s loc_696C
move.l #$40000003, (a6)
move.w #0, (a5)
move.w #$8F02, (a6)
andi.b #$EF, (VDP_Reg1_Val+1).w
move.w (VDP_Reg1_Val).w, (a6)
ori.b #$10, (VDP_Reg1_Val+1).w
move.w (VDP_Reg1_Val).w, (a6)
move.w #$8F01, (a6)
move.l #$93FF940F, (a6)
move.w #$9780, (a6)
move.l #$60000083, (a6)
move.w #0, (a5)
; ...
And this goes on for dozens of more lines of assembly! This is about as obtuse as programming the Genesis gets. You are essentially programming the raw “machine code” of the VDP by sending data to its various registers which model those specific capabilities. That said, if you were to directly program graphics hardware today it would be unimaginably more complicated. Part of the innovation required for today’s hardware to excel was in software. As we mentioned before, there were no “game engines” back then. To some extent, the game engine was built into the hardware. “High-level” concepts like “sprites” and “tiles” are, today, software concepts, not hardware ones. This is how modern game engines are so usable yet so powerful: the software libraries and tools they come with fill the programmability gap.
Enemy and character data. Most of the time here is spent getting the VDP in order, but just like maps required us to load data about NPCs and chests into RAM for the Field mode, battles require persistent enemy and character data as well. Here we decide what enemies are present, and load everyone’s starting hit points and other stats.
Mode: Battle
As you have seen, initializing battles is involved. Yet, compared to the whole battle subsystem, you might even call it quite tractable. For this post, we’ll take a brief tour of a few main subroutines of the Battle mode.
To start, let’s take a look at the game mode routine called from the main game loop:
GameMode_Battle:
tst.b ($FFFFEE5B).w
bne.s loc_9A4
jsr Battle_DrawCommandIcons(pc)
jsr RunBattleRoutines(pc)
jsr (Battle_UpdatePaletteObjs).l
jsr Battle_UpdateFighters(pc)
jsr RunBattleRoutines2(pc)
jsr (Battle_UpdateEnemySprites).l
jsr (Battle_RunObjects).l
tst.w (Current_Target_Index).l
bpl.s loc_988
lea (Obj_Fighters).l, a4
moveq #8, d7
loc_972:
_tst.w 0(a4)
beq.s loc_980
cmpi.b #5, $3(a4)
beq.s loc_99A
loc_980:
lea$40(a4), a4
dbfd7, loc_972
loc_988:
tst.b ($FFFFE486).w
bne.s loc_994
jsr (UpdateNemQueue).l
loc_994:
jsr (DMA_PlaneA).l
loc_99A:
bsr.w Battle_ClearCharTimerIfNotPresent
jmp (VInt_Prepare).l
loc_9A4:
jsr (Battle_UpdatePaletteObjs).l
jsr Battle_UpdateFighters(pc)
jsr (Battle_RunObjects).l
bra.s loc_99A
One early observation is that the Battle routine is not as well structured as the Field mode. There are lots of different states here, and they aren’t organized into a state machine, so they’re much more difficult to reason about. For example, there are multiple different variables checked (like tst.b ($FFFFEE5B).w and tst.w (Current_Target_Index).l) that control what happens each frame. It’s hard to tell you exactly what’s going on here.
Most of the time, however, it appears the job of this routine is to navigate the player’s myriad HUD options, evaluate those choices, and run enemy AI.
GameMode_Battle:
tst.b ($FFFFEE5B).w
bne.s loc_9A4
; if the flag at $FFFFEE5B is not set, continue...
jsr Battle_DrawCommandIcons(pc)
jsr RunBattleRoutines(pc)
jsr (Battle_UpdatePaletteObjs).l
jsr Battle_UpdateFighters(pc)
jsr RunBattleRoutines2(pc)
jsr (Battle_UpdateEnemySprites).l
jsr (Battle_RunObjects).l
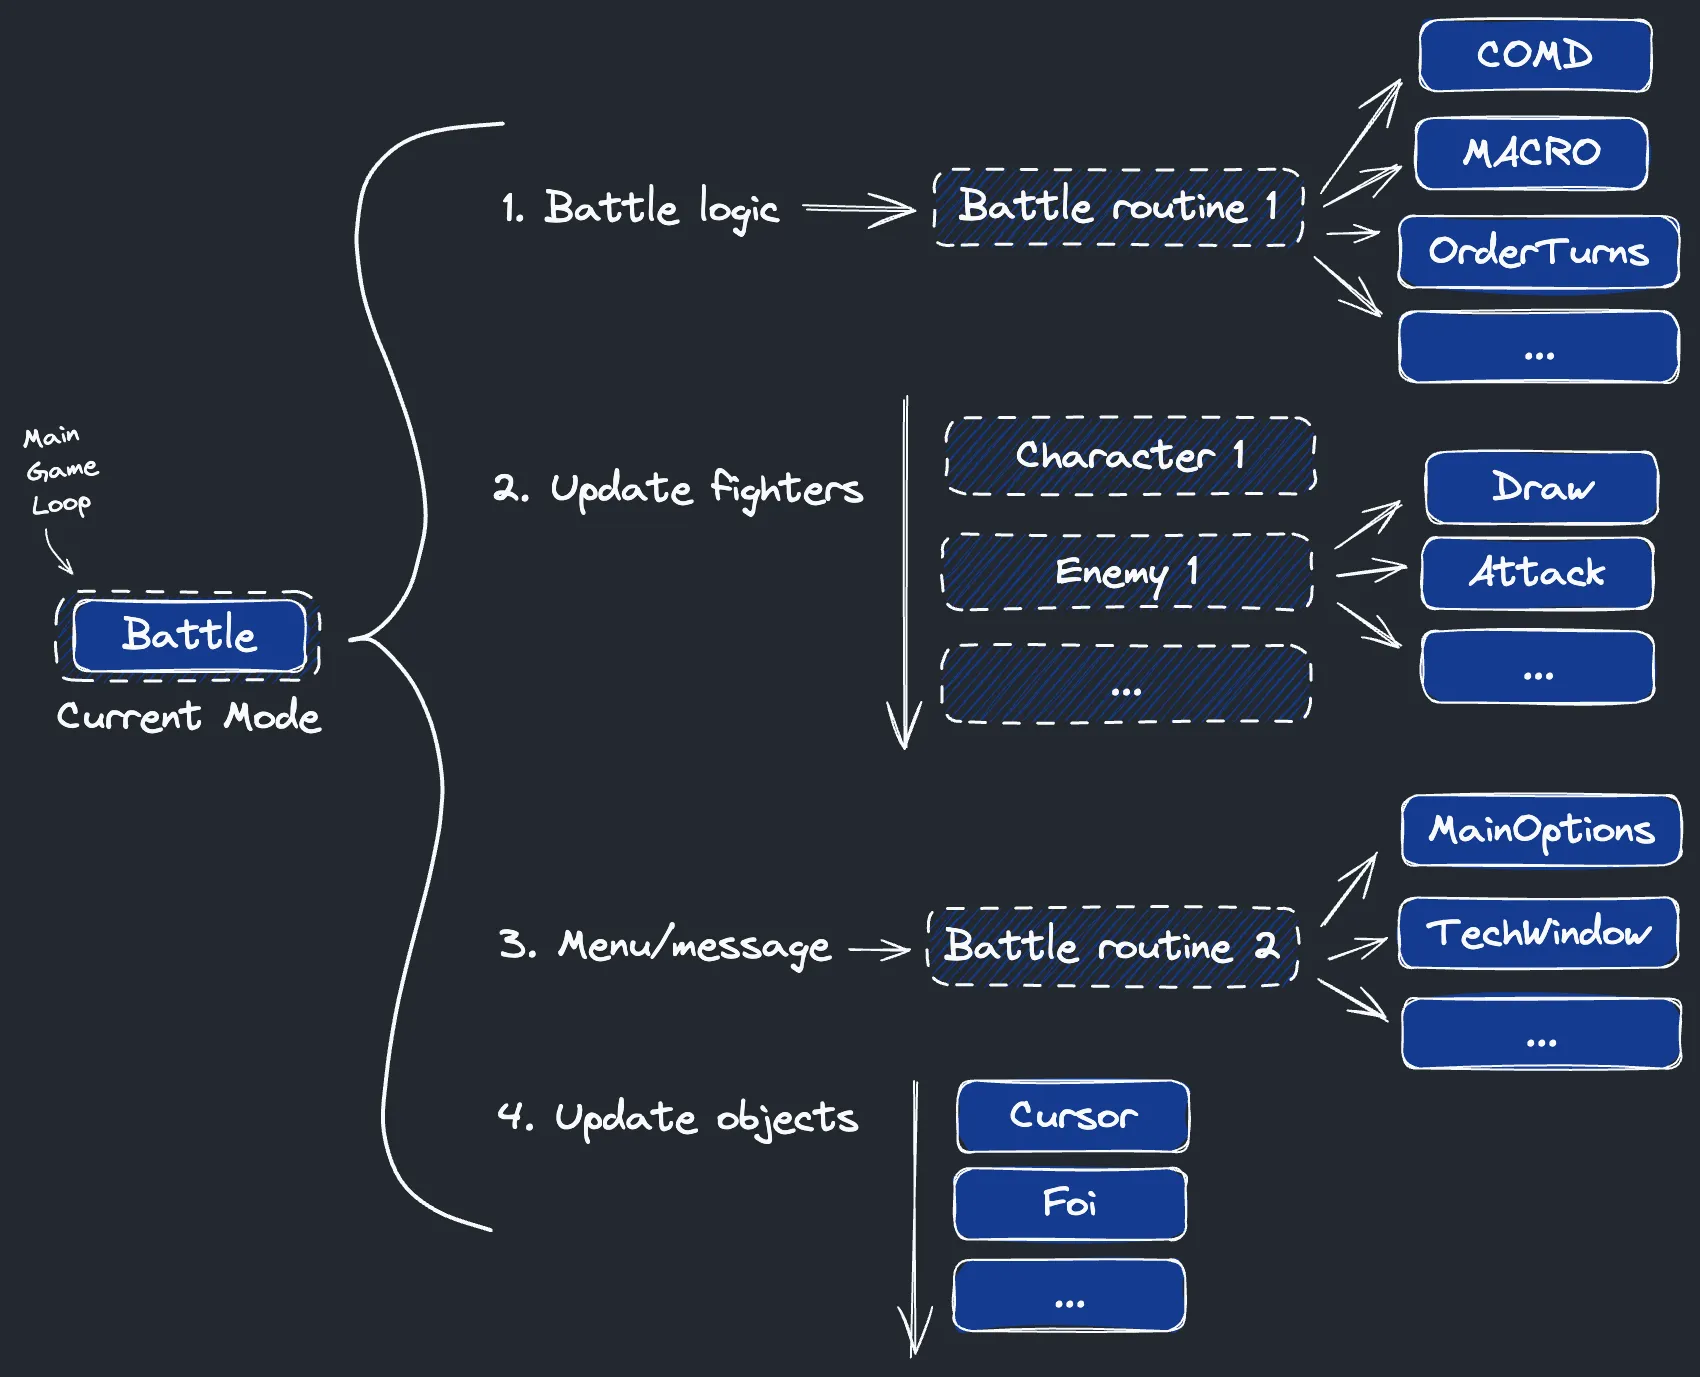
We can break this down into roughly four “stages,” each with their own states. These are effectively the four things that can happen concurrently during every frame of battle.
Figure 4. High level description of battle mode instructions, with a sample of possible objects and states.
Processing battle logic, like ordering turns or running attacks. Here we might determine, for example, the order of objects, taking into account stats and ailments like paralysis or sleep. This sets up state for the other stages of battle.
jsr RunBattleRoutines(pc)
Not all of the states of this stage are labeled, but you can get an idea thanks to the familiar FSM pattern:
RunBattleRoutines:	move.w	(Battle_Routine).l, d0	lea	BattleRoutines(pc), a0	adda.w	(a0,d0.w), a0	jmp	(a0)
BattleRoutines:	dc.w	BattleRoutine_Nothing-BattleRoutines	; 0	dc.w	loc_52C2-BattleRoutines	; 2	dc.w	loc_52D6-BattleRoutines	; 4	dc.w	loc_5380-BattleRoutines	; 6	dc.w	Battle_ProcessCOMD-BattleRoutines	; 8	dc.w	Battle_ProcessMACRO-BattleRoutines	; $A	dc.w	Battle_ProcessRUN-BattleRoutines	; $C	dc.w	Battle_OrderTurns-BattleRoutines	; $E	dc.w	loc_576A-BattleRoutines	; $10	dc.w	loc_6672-BattleRoutines	; $12	dc.w	loc_6670-BattleRoutines	; $14	dc.w	Battle_DoAttackEffect-BattleRoutines	; $16	dc.w	loc_67AE-BattleRoutines	; $18	dc.w	loc_67BE-BattleRoutines	; $1A	dc.w	loc_5366-BattleRoutines	; $1C	dc.w	loc_66B8-BattleRoutines	; $1E	dc.w	loc_684A-BattleRoutines	; $20	dc.w	loc_68C0-BattleRoutines	; $22
Running fighter updates. Each fighter (or participant) in the battle has their own state, as part of each object’s data in RAM. This is what tracks and implements every fighter’s individual actions or reactions, like attacking or taking damage, accounting for their own state.
jsr Battle_UpdateFighters(pc)
We won’t cover these states in detail (there are over 40!), but to give you an idea, here are the possible states for playable characters:
BattleCharacterRoutinePtrs:
dc.l Character_Init ; 1
dc.l Character_Draw ; 2
dc.l Character_SetupCommands ; 3
dc.l Fighter_DoNothing ; 4
dc.l Character_DamageAnimation ; 5
dc.l Character_Attack ; 6
dc.l Character_Dead ; 7
dc.l Character_Targeted ; 8
dc.l Character_Erase ; 9
dc.l Character_DoTech ; $A
dc.l Character_DoSkill ; $B
dc.l Fighter_TakeDamage ; $C
dc.l Fighter_ShowDamage ; $D
dc.l Fighter_OpenDamageWindow ; $E
dc.l Character_Defend ; $F
dc.l Character_DoItem ; 10
dc.l Character_DoCombo ; 11
dc.l loc_AF9C ; 12
dc.l loc_B1D4 ; 13
Presenting player choices and messages. In this stage is another FSM, and this one appears to be devoted to the many windows and menus that accept input and display messages.
jsr RunBattleRoutines2(pc)
To demonstrate this, here’s a look at the routine and a sample of the possible states:
Run objects. Finally, run battle “objects.” It appears “objects” are used to represent everything but the fighters: things like cursors, projectiles, and tech graphics. Each object type has its own routine to govern its behavior (particularly, animation, movement, and sound). This is the point at which these subroutines are invoked.
Next
In this post, we mapped out the high level contours of how Phantasy Star IV is brought to life. It revolves around a main game loop, which repeatedly invokes one of a small number of outer-most routines that engender the game’s top-level modes. The two most essential of those modes are the Field and Battle modes. In the Field, we broke down how controls are processed to move the party while the world turns around you. In the Battle mode, we saw a glimpse of the extensive low-level details that go into programming classic turn-based RPG battles.
In the next post, we’ll explore something I always wondered about. How do games program their cutscenes? Cutscenes flip everything we just covered about a main game loop on its head: instead of the problem of many independent, concurrent sequences reacting to the chaos of random numbers and player input, we instead need to describe a single coherent thread of concrete events that happen regardless of player input. This mix of interactivity with cutscenes is what revolutionized story telling forever.
For PSIV’s part, its cutscenes are famous for their in-game manga-like panels. Additionally, and unlike games like Final Fantasy VI, its events are commonly programmed directly in 68k assembly, rather than in a bespoke bytecode. This makes them very flexible (but also tricky!). As such, they’re super fun to learn about and play with. We’ll tour it in detail, next time.
Thanks for reading!
Footnotes
While assembly refers to direct processor instructions, it is still “compiled” into even more
fundamental “machine code” which encodes all the instructions as data.
This data is what gets stored on the actual read-only memory in the cartridge.
Unlike machine code, assembly can include custom labels defined
by programmers for maintainability.
When compiled to machine code, those labels are replaced
with the values they refer to, often pointers to some location in that read-only memory.
When “disassembled,” that instruction data is interpretted back into assembly.
This works well for the most part, because there isn’t much difference in the machine code and the
assembly… except for those labels.
Since the original labels which were lost in the process, they have to be reconstructed.
For a disassembler (a program that constructs equivalent assembly for given machine code), it has to come up with some unique name, and often the best it can do
is just name them sequentially (e.g. “label1”, “label2”) or after the location in the ROM that the label points to (a kind of natural key).
To make the code more understandable, fans like us have to reverse engineer plausible names.
That’s why you’ll still see generic names like “loc_64EAC” in some examples.
These are the disassembled labels which have yet to be renamed. ↩
You may count 7 states above, however as far as I can tell the last state (GameMode_JmpToVInt_Prepare) is never used. It would only pause the game until it was reset. The assembly actually contains lots of such leftover, unused, or useless code. It must have been difficult to keep track of such a huge amount of low level instructions with the tools of the era. ↩
The timing comes from the amount of iterations through the loop, and the fact that each loop waits for a vertical interrupt. A vertical interrupt, in NTSC, occurs 60 times per second. The loop executes a maximum of 180 times. So that means we can figure out the expected wall time using basic math: 180 loops * 1 interrupt per loop / 60 interrupts per second = 3 seconds.
Where does 180 come from? See the line move.w #$B3, d1. This sets the d1 register (a register is basically a location in very fast but very limited memory) to 179 (or B3 in hexadecimal). The loop always executes once, regardless of this value. That means the register value is how many additional times the code executes, which is why it is one less than 180. 1 time + 179 repetitions = 180 total. 3 seconds.
Except, on PAL consoles, vertical interrupts occur only 50 times per second. In that case, the math works out differently: 180 / 50 = 3.6 seconds.
The implications go way beyond this simple Sega logo loop. This is just one small example of why retro games were sometimes specialized for PAL vs NTSC. If you only program for one frame rate, the timing will be off everywhere else. PSIV is one such game: it does not have a version optimized for PAL timings, only NTSC, and so playing it on PAL consoles is slower across the board. Theoretically, they could have compile a separate version that, for example, set d1 to 149, for (1 + 149) / 50 = 3 seconds. However, still, most timings are very short, e.g instead of multiple seconds they are closer to single digit vertical interrupts. In NTSC one vertical interrupt is 1/60th of a second. There is simply no way to achieve that on PAL hardware. ↩
Getting computers to be random is quite difficult. Modern hardware uses real-world sources of “randomness”, like microphone noise or input signals (or lava lamps). Retro consoles didn’t have this built in, so games had to come up with their own ways to generate “random” numbers. PSIV utilizes a relatively common approach for the time: it starts with a hard coded seed value (711,800,411 to be exact!), and computes an update (multiplying it by some prime number and doing some bit manipulation) to this value many times, such as every frame or even multiple times a frame, depending on the current state. As the current state depends on player input, it effectively uses player input as a source of “real world” randomness. ↩
Be the first to witness this legendary game like never before.
Sign up for our newsletter to get exclusive behind-the-scenes peeks, story
insights, early-access patches, and more. We respect your inbox: expect only occasional, high-value updates with no spam.
Curious to share what it takes to create a "ROM-hack"?
Join our community on twitch.tv
for live sneak peeks and a firsthand look at how we're reimagining
Phantasy Star IV. Engage with our team, ask questions, and be part of the
development adventure. Catch us every Sunday at 2:30PM ET.
Can't make it live? No worries–watch anytime on YouTube .